
Note: This post requires you know some basic Python. You should be comfortable with what functions are and how to write them. Here is a quick refresher! It would also be nice if you understood the basics of dictionaries: what they are, how to access elements of one, and how to store information into one. Here’s a quick guide for that. If you’re comfortable with Java, you can read my Python for Java Programmers series to get up to speed. You should have Python 3 installed on your computer if you want to follow along (download it here), but you can also follow along with the interactive repl.it embeds on the page. Finally, you should know some basic HTML, which is a markup language for creating web pages. It’s super easy to get started, and you can get a short refresher to HTML here.
Table of Contents
- Table of Contents
- Introduction
- What is Flask?
- How to Install Flask
- Hello World!
- How To Get User Input
- Make nice pages with HTML
- Keeping Track of State
- Conclusion
Introduction
A lot of people who first get into programming do so because they want to make cool apps. They want to make a website that they can send to friends, or even share with the whole world. So they take their first intro CS course, and all though they learn how to use loops and lists and all that good stuff, they still can’t make an app! All they can do really is make a program that takes some input from the command line, but nobody’s gonna be impressed with that! These people just want to make some cool apps, and maybe even create some quick hackathon projects.
Do you relate to the unnamed person in this article? If so, then read on! I was once like you, doing hackathon projects on the command line (seriously). But then I learned about the beautiful world of web development, and how easy it was to put my Python on the web. And it’s made super easy by this Python framework called Flask.
There are already a lot of Flask tutorials out there (here is the most famous one), but they’re much more concerned with how to do things the “right” way. Those are great for learning how to make Flask apps for heavy duty websites, but make a horrible experience for beginners just trying to make a quick website. So I thought I would start from the bottom up, and teach you how to get started making quick and easy Flask apps, starting from functions you already know how to make. This post is also great as a guide for teachers who teach Python and want a good way to motivate students, by showing them how to use their Python skills and make web apps with them without learning too much boilerplate. I’ll show you how to take your Python functions that you’re already making, and put then on the web!
Note: I based this blogpost off a slideshow I made for when I was helping design COSI 2A at Brandeis University for my senior thesis. You can see those slides here. You may use them, but please give credit back to my website!
What is Flask?
![]()
Put simply, Flask is a Python web framework that makes it stupid easy to create websites, while at the same time being powerful enough to be used at companies worldwide. A framework is software that abstracts complicated ideas away from you, and basically handles all of the business logic of what needs to be in a website, so you only need to worry about the code for the bits unique to your specific website. Flask likes to call itself a microframework, meaning that it tries to be as minimalist as possible. This light-weight design means that you can create a website with very little code!
Here are some examples of companies and projects that have used Flask, to hopefully prove to you that it is not just a toy (source):
- Twilio
- Uber
- Obama’s 2012 Campaign
- Kyruus
Just like Python, Flask is easy enough to be picked up by beginners, but if you put the time into it, you can make a career out of it. Hopefully now you’re feeling motivated enough to get started!
How to Install Flask
If you already have Python on your computer, then great! All you need to do is pip install flask. If you’re not sure how to do that, just open your terminal or command line, and type:
- For OSX/Linux:
pip3 install flask - For Windows:
pip install flask
And it should be installed! You can verify this by trying to run a Python program with just this in it:
from flask import FlaskIf it runs without error, you’re good to go! If you’re stuck, feel free to shoot me an email at [email protected] and I can take a look! You can also follow along without installing anything - the AMAZING website www.repl.it has now developed support for running Flask apps, so you’ll be able to see the results of the code in real-time. Still, you should try to run it locally, so you’ll be able to tinker around with it and see how it all works. Like my other posts, I’ll embed some repl.it pages here for your convenience. I definitely recommend you try to run it on your own computer though, just to learn how to run that kind of thing.
Hello World!
Believe it or not - the Hello World app for Flask is only seven lines long. That’s pretty wild, considering you need at least five lines to write a Java command line Hello World app. With just seven lines, you’ll have enough code for a functioning website. Now I’m going to show you those seven lines, but don’t freak out! I will explain them all, just give me a second!
Ok.
Are you ready?
Here they are:
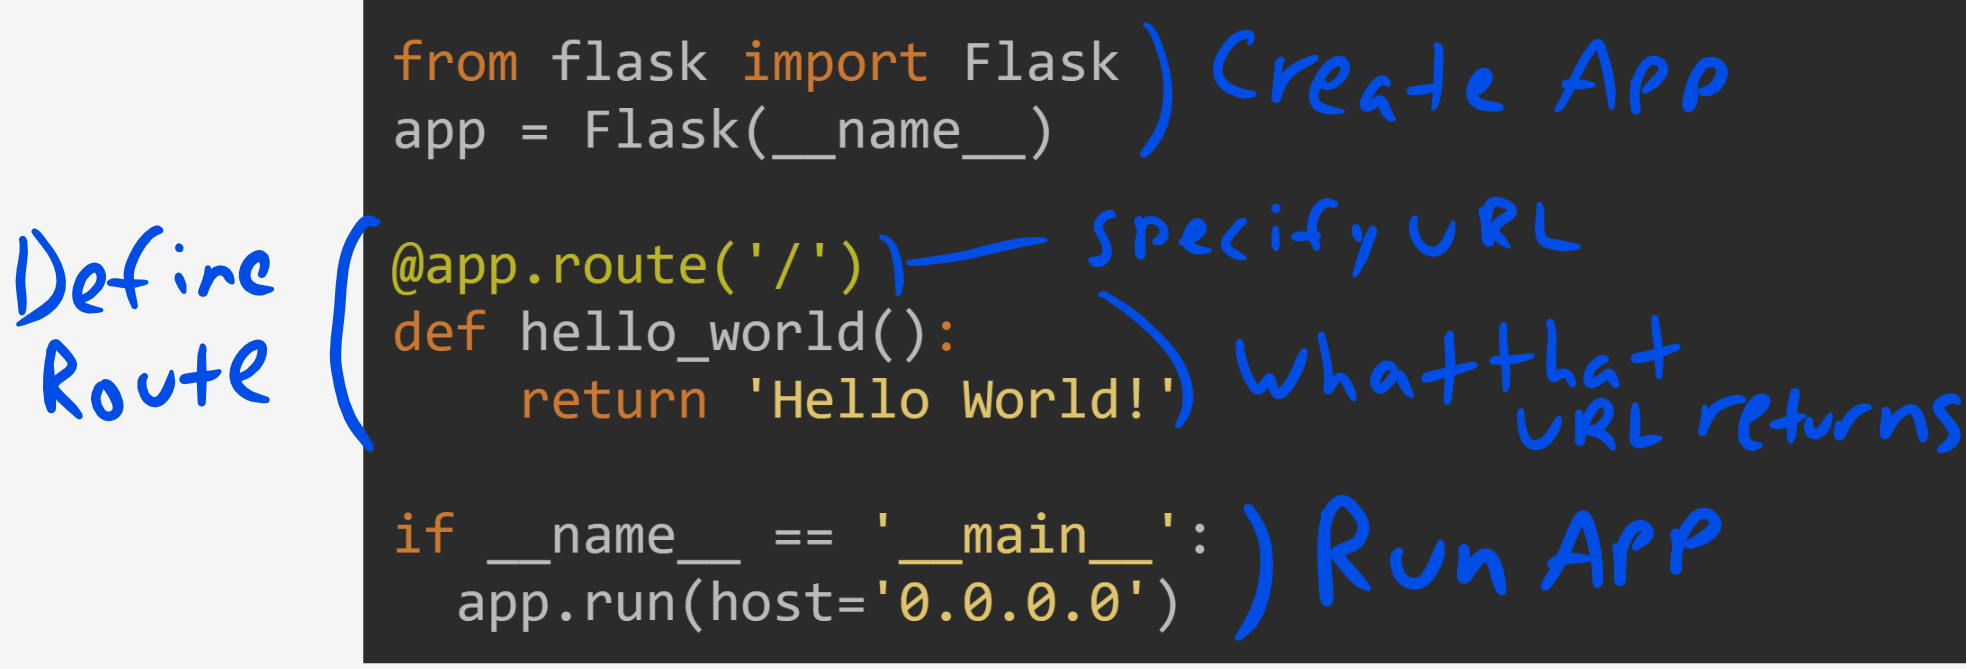
from flask import Flask
app = Flask(__name__)
@app.route('/')
def hello_world():
return 'Hello World!'
if __name__ == '__main__':
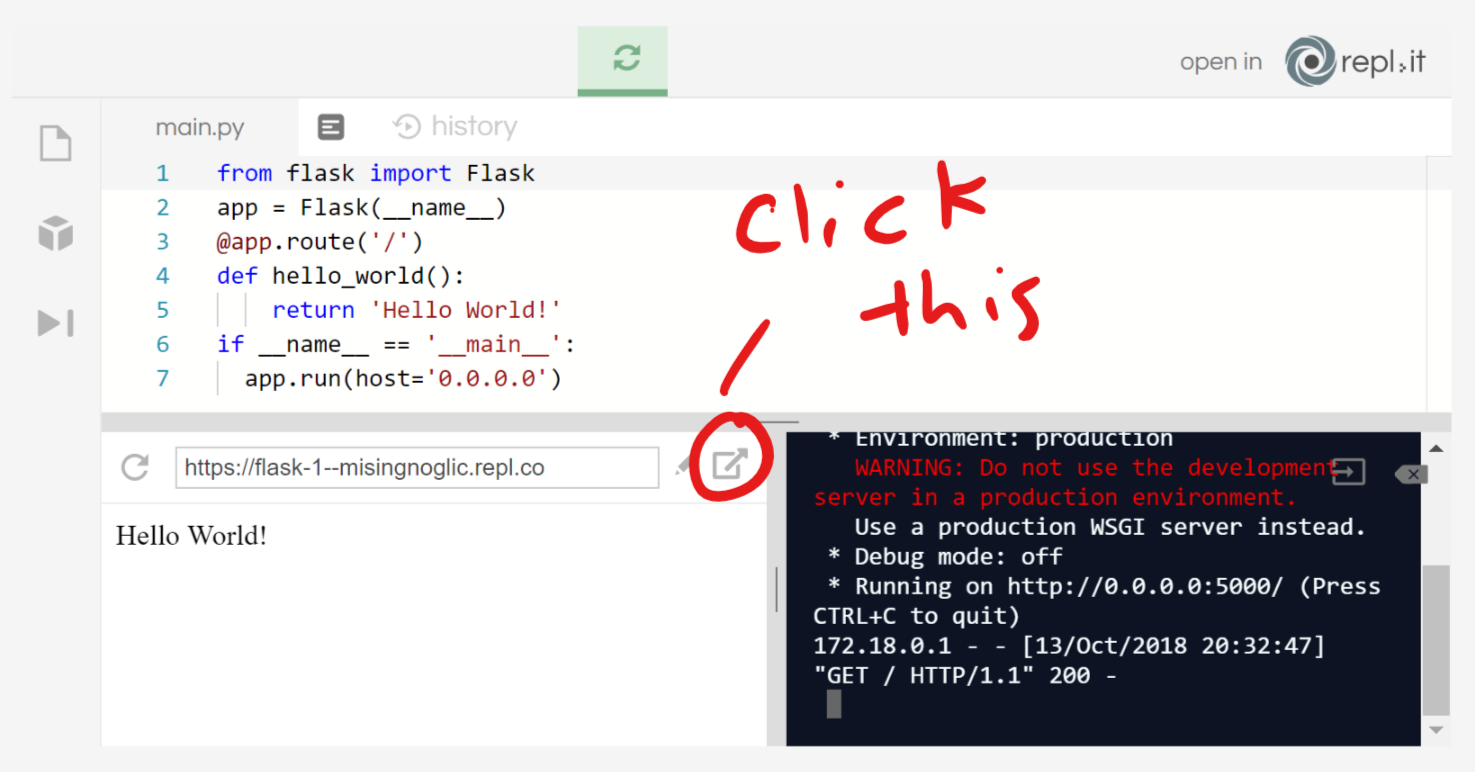
app.run(host='0.0.0.0')You can save this file as flask_test.py and run it in your terminal, and it should look something like this:

WARNING: Do not save this file as flask.py. This will confuse Python, since that’s the name of the Flask library it’s trying to import. See here
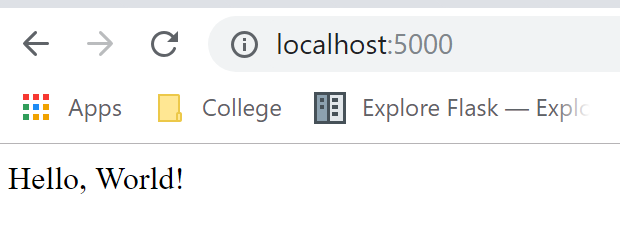
Once it’s running, open your browser, and go to “localhost:5000” in your browser to prove that this does actually what I said it would do. localhost is not a real website address, but rather an address referring to the “local” code running on your computer.
And here is the repl.it embed - click the run button, and then open the given URL in your browser. There’s also a little window where you can see what’s going on, but for more complicated websites it’ll be good to just open the REPL in another window. Change the string as well to experiment, just be sure to rerun it first!
From now on I’ll refer to the URL as localhost, but each REPL will have a different URL if you decide to use those. I strongly recommend you try running the code on your own computer, but if you don’t have time for that the REPLs are a great resource!
Let me go through each of these lines, to properly explain what exactly is going on. Besides lines 3-5 though, it’s mostly boilerplate.
Line 1:
from flask import FlaskAll this is doing is importing the Flask framework into your code. When we installed Flask earlier, it downloaded the code onto your computer, which allows us to import it into any script you write.
Line 2:
app = Flask(__name__)All this is doing is creating a new “app” which will be run. The app will manage all the different things your website will be able to do. __name__ is a variable in Python that is automatically defined - you don’t really need to worry about why that is passed in. Just know you need this line to create the Flask app.
Lines 3-5:
@app.route('/')
def hello_world():
    return 'Hello World!'
Surely you’ll recognize lines 4 & 5 - they define a function that takes no parameters, and returns the string “Hello World”. The only weird part is probably the line 3, @app.route('/').
This syntax is called a decorator, and they are actually pretty interesting. But for the purposes of knowing Flask, all you have to know is that adding this line on top of a function definition turns it into a “route.” Basically, it means if you go to your website with a slash at the end and nothing else, the code in the hello_world function will be run, and whatever is returned will be shown in your browser. We could add another route like this:
@app.route('/test')
def testing():
    return 'test'
And then when we go to localhost:5000/test, we will see just the word test. When you go to a URL on your app, your flask app uses these routes to figure out which function corresponds with your URL. Check it out in this REPL:
Note that the function name doesn’t really matter, since you’re never actually calling it. You should still pick a good name, however.
If you’re curious about what decorators are and how they work, check out this post.
Lines 6-7:
if __name__ == '__main__':
  app.run(host='0.0.0.0')
if __name__ == '__main__': is basically just Python’s way of saying “run this code only if I ran it.” As I said before, __name__ is a variable that Python automatically creates, and it’s equal to "__main__" when it’s you that ran the code (as opposed to another script running the code). You’ll see this line a lot while doing Python, so it’s good to get used to it.
app.run(host='0.0.0.0') basically runs the app variable that you’ve created in line 2, and the host we passed in makes it run on localhost.
If that was confusing, the good news is that you don’t really need to understand anything but lines 3-5, which defined the route. When you make your own app, you can define more and more routes, for the different URLs of your website. Everything else you can just copy and paste from here.
How To Get User Input
So now you can make these static web pages, but you could have already done that with just HTML! How do you make your routes take arguments, so the website can be more dynamic?
Good question! The answer is that you can define a route like this, with a variable inside it:
@app.route('/hello/<name>')
def hello_name(name):
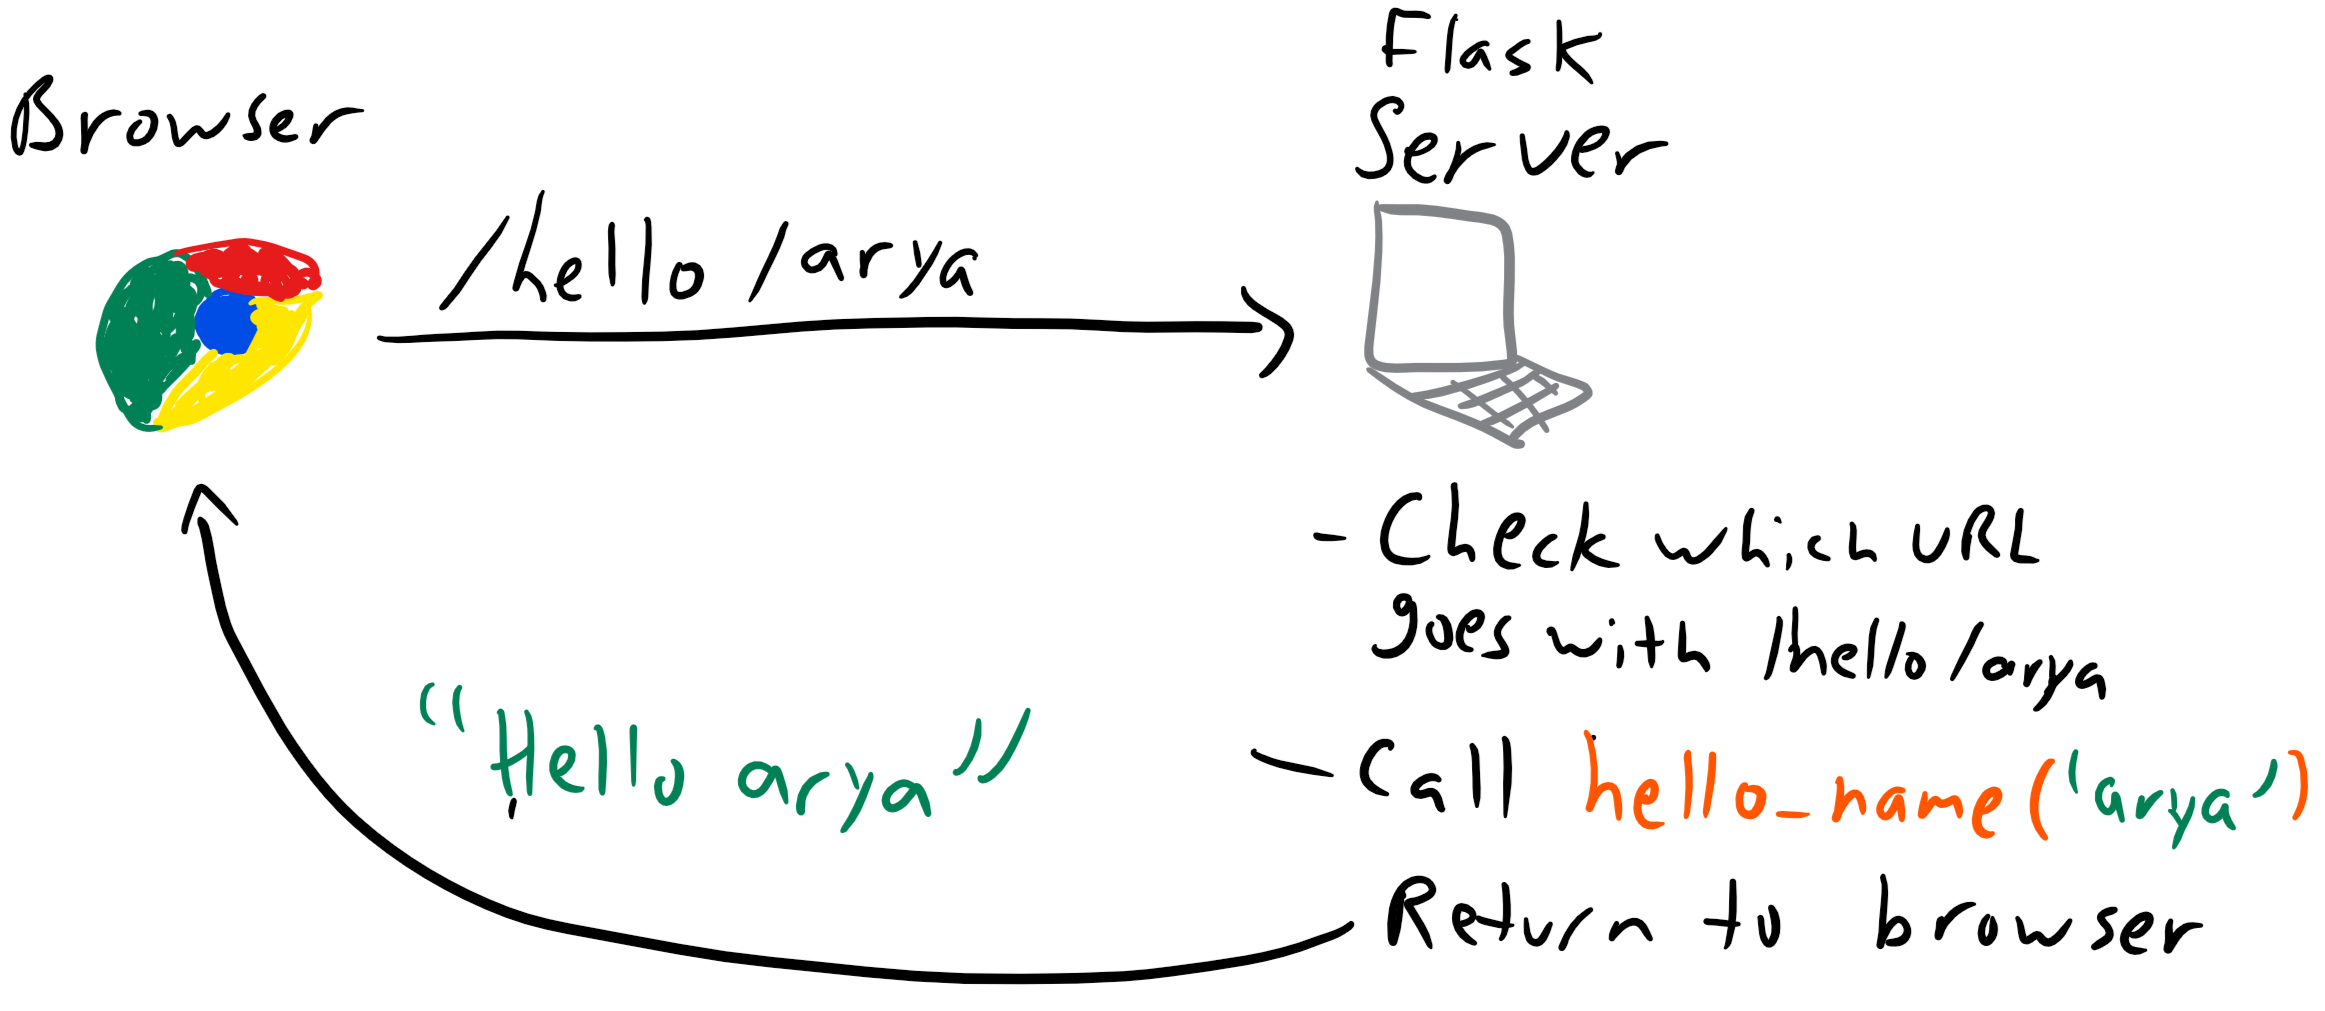
return 'Hello '+ name + '!'The <name> in the route URL is a placeholder - any name you put there will be passed into the “hello_name” function. For example, if you run your flask app with this new route, and then go to the URL localhost:5000/hello/arya, the following steps will happen:
- The browser asks the server at the URL for a response.
- The “server” in this case is your computer.
- The server sees this request, and also sees the URL you gave.
- The server figures out which function corresponds to the URL you gave, and calls it with the right variables.
- In this case, the function is hello_name(), with the value “arya” passed through the variable
name.
- In this case, the function is hello_name(), with the value “arya” passed through the variable
- The server returns the string “Hello arya!” which is returned from hello_name(“arya”) which is displayed in the browser.
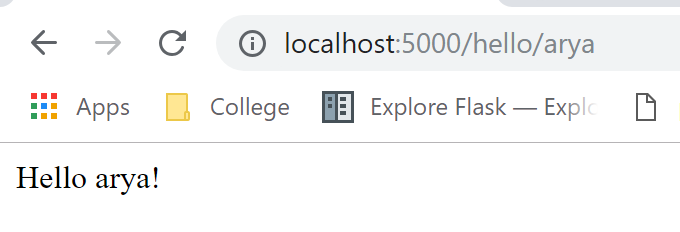
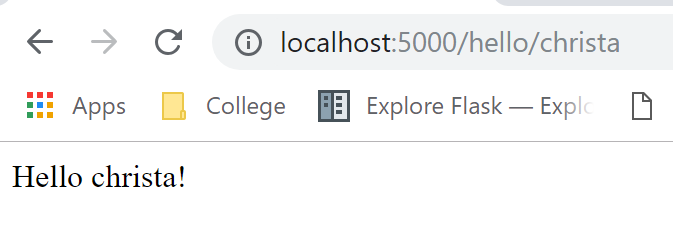
And then if you go to localhost:5000/hello/christa - the same thing will happen with the name “christa” being passed in.
As a test, try modifying the route to always return the first letter of the name capitalized.
Please excuse my awful art skills, but here is the above in drawn form.
Note that the variable passed though the URL is a string. If you want it to be another type, you can manually convert it. You can also specify the type in the route like this. For example, if you want a int, you can do:
@app.route('/square/<int:num>')
def f(num):
  # No conversion of x needed.
  return str(num**2)
Notice that <int:num> will cast the num passed in the URL as an int.
Let’s say you have a normal Python function that returns some computation. For example, given a number, it returns all the factors of that number, or numbers that divide evenly into your input.
def factors(num):
  return [x for x in range(1, num+1) if num%x==0]

print(factors(30))  # [1, 2, 3, 5, 6, 10, 15, 30]
I know it’s a little dry, but it’s a good example of a “school” type of function that one would be asked to code for an assignment or test that takes in a number and returns a list, so for the rest of this tutorial, I will use this factors function as an example of a function you would want to turn into a website.
Let’s make this into a website!
from flask import Flask
app = Flask(__name__)

def factors(num):
  return [x for x in range(1, num+1) if num%x==0]

@app.route('/factors/<int:num>')
def factors_route(num):
    return "The factors of {} are {}".format(num, factors(num))

if __name__ == '__main__':
    app.run(host='0.0.0.0')
Looking good! At this point we’ve basically learned how to take any Python function you’ve already made, and create a web interface for it. Now how do we make it look nice?
Make nice pages with HTML
So now we can send data to the Python code, and the Python code can compute using that data and return data back to the browser. And that’s all cool and all, but how can we actually make this look nice?
If you don’t already know, HTML is the markup language that allows you to specify what a given webpage will look like. If you haven’t already, check out the HTML quick tutorial here, so you can use this to make our websites.
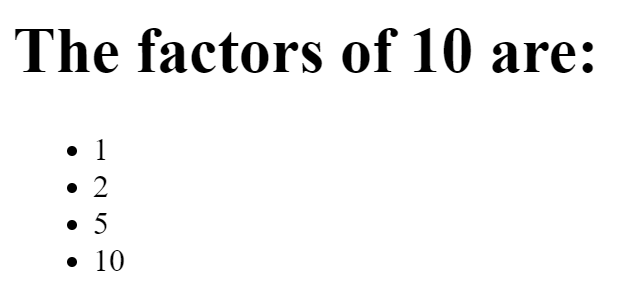
If we were to make a HTML page for one of our factors, it would probably look something like this. The <h1> tag is used to style the header, the <ul> tag is used to mark an unordered (bulleted) list, and the <li> tags are to designate each list item.
<h1>The factors of 10 are:</h1>
<ul>
  <li>1</li>
  <li>2</li>
  <li>5</li>
  <li>10</li>
</ul>
The HTML code looks like this when rendered:
Note - if you want to test what HTML looks like quickly, just throw it into jsfiddle.net, which is a great website for quickly testing and iterating on HTML.
Now this isn’t the most stylish website ever, but it’s definitely better than the old version where we just returned the string of the list to the browser. At least with HTML it looks like a legitimate website. With some simple CSS and graphics, you could make this look much nicer. If you’re interested, Codecademy has many classes on HTML/CSS. Teaching HTML/CSS is way beyond the scope of this tutorial but definitely skills worth learning for any future web developer! With both HTML/CSS (front-end) skills, and Python web development skills (back-end), you can make some really sleek web apps!
The only problem now is how to pass our data to the HTML, so we can return some nice HTML for the factors of any number. We don’t want it for just 10, we want this page for any number we give it.
We could write a function to create the HTML string, and that would actually work. It’s not pretty, but it works (don’t worry too much about understanding this one, there’s a better solution upcoming).
# Our second version, using HTML to make it look nicer
@app.route('/factors_raw/<int:num>')
def factors_display_raw_html(n):
	factors_list = factors(int(n))
	# First we put the stuff at the top, adding "n" in there
	html = "<h1> The factors of "+n+" are</h1>"+"\n"+"<ul>"

	# for each factor, we make a <li> item for it
	for f in factors_list:
		html += "<li>"+str(f)+"</li>"+"\n"
	html += "</ul> </body>" # the close tags at the bottom
	return html
So this works and generates the HTML for any number we give it, but it’s really unreadable and hard to understand. Surely there’s a better way to do things than this, right?
Yes. Yes there is…
HTML Templates
To create HTML pages on the go, Flask supports this HTML templating engine called Jinja2, which basically lets you put variables and loops inside of HTML in a clean and efficient way. It has kind of a new syntax, but it’s fairly easy to work with once you’ve seen an example. Here is the template we will create for the factors webpage.
<h1>The factors of {{ number }} are: </h1>
<ul>
  {% for factor in factors %}
  <li>{{ factor }}</li>
  {% endfor %}
</ul>
Notice how this template has two variables, number and factors. We will pass those two variables into this template. You can refer to variables in these Jinja templates by putting them around curly braces.
Additionally, if one of your variables is a list or other iterator, you can loop through it by adding a loop like `` tag. This is just a taste of what these templates can do - they can also do if statements and other cool features like inheriting from other templates. We take advantage of this looping feature in this template by creating a <li> element for each item in factors.
Save this file as factors.html in a folder called templates in the same folder as your Flask code. Then, you can call the route like this in your Python code:
from flask import render_template

@app.route('/factors/<int:n>')
def factors_display(n):
	return render_template(
		"factors.html",  # name of template
		number=n,  # value for `number` in template
		factors=factors(n) # value for `factors` in template
	)
To properly render the template, we can import the render_template function and call it. The first argument is the name of the template in the templates folder, which we called factors.html. Then, we pass in each of the variables that the template expects as keyword arguments. For number we just pass in n, and for factors we just pass in factors(n). This demonstrates a really important pattern in web development, that logic should stay in one place (the python file), and the design should stay in another (the template). By separating these two, we keep our code easy to read and maintain. Let’s see how it works:
To see the template file as well, view my REPL on the repl.it website, and look on the left side for the list of files.
Note - for using templates on repl.it, you need to have at least two python files in your workspace because of a bug. The second Python file can be completely empty, but that’s why I have the dummy.py file in the REPL.
It’s pretty cool that for any URL /factors/n, it will automatically generate the HTML, right? When you go to the URL, the browser will request the webpage from the server. The server will render the HTML by passing in the correct variables, and then return that HTML back to the browser! And of course this doesn’t just have to be factors: you can format any input type into any Jinja template you’d likeLook how much you can already do!
Keeping Track of State
Now we made our website, and can create a nice looking page for any Python function we can think of! That’s pretty powerful in of itself - you just give Flask some input through the URL, and then you can get the output as an HTML page.
But what if we want to do something else. What if you want to make some kind of game that requires intermittent user input, and you need to somehow keep track of the user’s state. This will allow us to have some data stored throughout the user’s session on the website, as sort of a “memory” of what’s happened before.
To keep track of previous data, you can use a session, which is a temporary storage connected to a certain user’s current session. Flask stores the data of a session client-side in a cookie on the browser (source).
Flask does something incredibly nice though. You can import session, and then you can basically use this session object like a dictionary that’s associated with each user of your website. You can use a session object to store data related to that user, which persists through page refreshes and browser crashes. Here’s what you have to do to set that up:
At the top of the file, import session, and then after creating your app, you should add these additional two lines:
from flask import Flask, render_template, session
app = Flask(__name__)
# Add these extra two lines
app.secret_key = 'your secret'
app.config['SESSION_TYPE'] = 'filesystem'WARNING: In an actual production, you want to use an ACTUAL secret key that nobody knows. In this case it’s fine, since we’re just making toy apps, but in a real product, it needs to be an actual secret. This is because the session data could contain private information for a user, and if someone gets access to the cookie AND knows the secret, they’ll be able to look at all your users’ session data. Do not use this to store any sensitive data such as passwords. If you’re curious how Flask uses this secret key, there’s a good explanation here as well as here.
Once you have that set up, you can use the session object just like a python dictionary. And the beauty of Flask is that you can think of it exactly like a regular Python dictionary. Here’s an example, where every time you load the home page, it will count up until 10. After 10, it will delete itself and start over.
@app.route('/')
def home():
  # See if x is in the session
  x = session.get('x', None)
  if not x:
    # If it's not there, set it to 1
    session['x'] = 1
  elif x>=10:
    # If it's 10, clear and start over
    session.clear()
    return "Session Cleared"
  else:
    # If it's there, add 1
   session['x']+=1
   # Display current count
  return str(session['x'])
You can see it in action here:
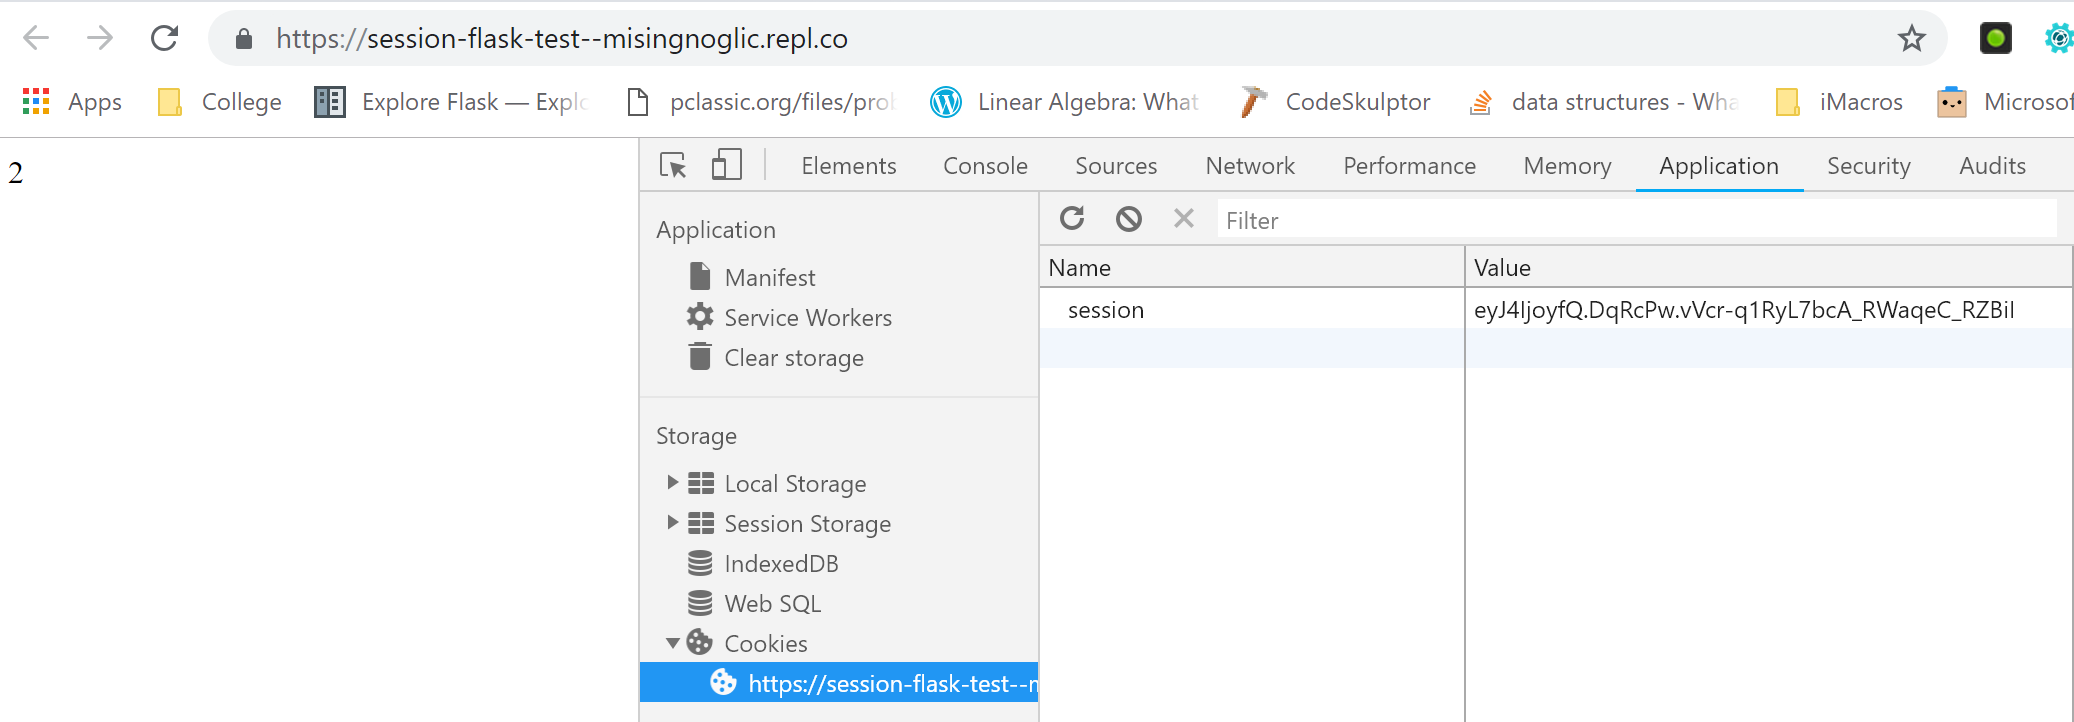
If you open up the Chrome Developer tools (More Tools->Developer Tools) and click the Application window, then click on “cookies”, you can see that the session data is saved as a cookie in your browser, but encrypted with the key you set. When the server reads the cookie, it can use the key to decrypt the cookie and read/modify the information. That way, one user’s session does not affect another user’s. You can test this by opening another incognito window with the URL. Pretty cool to see how that works, and that Flask takes care of all the annoying parts for you!
Here’s another example of a website that could use the session. Let’s use the session to count the result of every number we send to the route so far.
@app.route('/<int:x>')
def count(x):
  # See if we already instantiated the list
  s = session.get('sum', None)
  if not s:
    # If it's not there, add our first item.
    session['sum'] = x
  else:
    # If it's there, add the current number
   session['sum']+=x
   # Display current count
  return str(session['sum'])
Once you run this, go to localhost:5000/10 and keep refreshing, and notice how the output keeps going up by 10. Enter another number in the URL, and it’ll go up by that number too.
These are both kind of toy examples, but you can imagine creating a game that keeps track of stats like HP, items, weapons, etc… Especially combined with templates linking to other routes, this could be a really cool project! Keep in mind that these URLs are not the best way to pass data (you should really use forms for that), but in terms of getting started URLs are a great place to be!
Conclusion
I hope you found this Flask tutorial easy to follow and comprehensive enough to give you what you need to get started! Of course there is so much I haven’t gotten to cover here, such as forms for submitting data (so you don’t have to submit through the URL), adding CSS to your templates, storing data in a database, logins, actually uploading your website to a server, using APIs, and many other topics. If there is something I didn’t cover that you want to do, it’s easy enough to Google something like “Flask template if statement” to find out what exactly you need to do. If you’d like a more solid tutorial, definitely check out Miguel Grinberg’s Flask Mega-Tutorial, where he’ll take you through step by step everything you’ll need to know about Flask. You can also check out the Flask official quickstart, tutorial, or documentation. Or if you like my style and want me to rant about cool and useful Flask stuff in no particular order, let me know that this is a topic of interest. I can also come up with a web app idea, and show my process in creating it. Web development in Python holds a special place in my heart, and I hope that I can spread this joy to you as well :)
If you’re interested in how the internet works in general, check out my friend Seth Rait’s two part blog post on how the internet works - Part 1 & Part 2
If you found this post useful, please share it with any friends who may like it, or on any relevant social medias. I’d also appreciate any feedback in the comments or in an email. You can also tweet at me! Also - please share with me any cool websites you’ve created! I’d love to see them :)
Let me know if you like blogs like this, where I talk about more applicable programming topics in a friendly/easy way! I want to write another post about APIs that can make your programs text phone numbers and do sentiment analysis, so let me know if this would interest you. If you want to be updated when a new post comes out, please sign up for the mailing list as well!
Thank you to my girlfriend Christa for making the sweet watercolor logo for this post! Thank you to her as well as reader Chanwoo Park for proofreading this post beforehand!
Thank you, and until next time!
-Arya
Edit Oct 18 2018: OMG, I’m so happy with how much attention this got, with 900+ upvotes on /r/learnprogramming, 160+ on /r/learnprogramming (before the mods deleted it for some reason), and 2000+ page views on the first day it was live. Thank you all so much for the support, and I can’t wait to make my next post :)